SSH双因素认证
前言:
SSH服务是目前最常用的远程登陆linux的服务,方便、安全、快捷。一般使用root账号进行登陆,一旦登陆成功,就相当于获得了系统的最高权限,但是目前ssh服务,没有出现远程漏洞,都是靠暴力破解root密码的方式,进行攻击。
因此,如果管理员的安全意识,配置一个弱口令,很容易导致密码被破解,但是配置了一个超强密码\(10位以上,包含大写字母、小写字母、数字和特殊字符\),足够强大,可惜若不天天输入一遍很难记住。在安全与可用性之间,难于选择。
为了解决ssh安全性, 常用方案:
ssh私钥认证
但是又很难随时随地获得私钥限制登录源IP地址
本身ip地址经常变化,在家需要登录,在公司需要登录,手机需要登录?fail2ban
失败几次就会退出,锁定ip,有可能将自己所在外边采用双因素认证是目前实现比较多的方法
Two Factor Authentication;MFA,Multi Factor Authentication,在输入密码的同时需要输入一个一次性口令(OTP,One Time Password。这种方案也有软件实现和硬件实现,软件例如google authenticator、Symantec Validation and ID Protection \(VIP\) ;硬件例如 RSA SecurID、飞天诚信的密保产品。
双因素认证
是说,用户一次登陆成功,需要两部分密码,一部分是用户与服务器共享的随机数字\(根据时间,每分钟会变化的\),一部分是系统自身的原始密码。这样,在一次登陆过程中,首先提示用户输入,随机变化的数字\(也称PIN码),如果成功,则继续输入固定密码。有点类似登陆网站时的验证码,但验证码是返回给客户端展示的,只是为了区分人和机器,而双因素认证是用户和主机直接利用早已经协商好的key,共同基于时间生成的相同数字,理论上不存在验证码的破解问题。但是验证PIN码必须设置次数限制,否则无限次输入,就存在暴力猜测问题,因为PIN码为了简单,一般都是6位数字。
简单说,双因素认证,就是两步认证,包括随机码和原始密码。基本上满足目前安全需求。
实现:
双因素实现,相对来说很简单,配置起来也比较容易,常见的实现实用google authenticator, 是由google开源,一套包括libpam和mobile端的代码的功能集合。简单实用,方便快捷。但随着需求不断的变化,后期我们也会发现,采用的解决方案也是不同,每种方案往往有其适用的场景。
需求1: 有一台公网VPS,只有我自己(或几个人)需要登陆ssh,但为了安全,希望启用双因素认证。 这个时候选择google authenticator(google身份认证器). 几分钟可以完成部署。
环境说明:
linux: CentOS 2.6.32-358.el6.i686
手机: iphone一部
linux系统配置
- 用安装包安装google身份验证器:
yum install google-authenticator
如果提示 No package google-authenticator available. 请先安装epel源,linux EPEL源安装。
- 配置google authenticator
   [root@localhost ~]# google-authenticator
https://www.google.com/chart?chs=200x200&chld=M|0&cht=qr&chl=otpauth://totp/[email protected]%3Fsecret%3DXQLESYZGNN6BUILX
Your new secret key is: XQLESYZGNN6BUILX
Your verification code is 239306
Your emergency scratch codes are:
  38922819
  16678863
  40290258
  78037940
  91109687

Do you want me to update your "~/.google_authenticator" file (y/n) y

Do you want to disallow multiple uses of the same authentication
token? This restricts you to one login about every 30s, but it increases
your chances to notice or even prevent man-in-the-middle attacks (y/n) y

By default, tokens are good for 30 seconds and in order to compensate for
possible time-skew between the client and the server, we allow an extra
token before and after the current time. If you experience problems with poor
time synchronization, you can increase the window from its default
size of 1:30min to about 4min. Do you want to do so (y/n) y

If the computer that you are logging into isn't hardened against brute-force
login attempts, you can enable rate-limiting for the authentication module.
By default, this limits attackers to no more than 3 login attempts every 30s.
Do you want to enable rate-limiting (y/n) y
上述共需回答4个y
第1个:是否更新你的google认证文件,由于第一次设置,所以一定选y
第2个:是否禁止口令多用,这里选择y,禁止它,以防止中间人欺骗。
第3个:默认情况,1个口令的有效期是30s,这里是为了防止主机时间和口令客户端时间不一致,设置的误差,可以选择y,也可选n,看要求严谨程度 (因此如果选择Y,即使密钥过期并且在4分钟内也可以使用)
第4个:是否打开尝试次数限制,默认情况,30s内不得超过3次登陆测试,防止别人暴力破解
通过上面信息,可以知道 本次google autenticator为我们生成了一个随机的私有key(XQLESYZGNN6BUILX),未来手机和linux服务器进行认证,就是依赖这个共享key和时间生成随机数字。
同时生成了几个可以临时使用的随机码:
  38922819
  16678863
  40290258
  78037940
  91109687
当你没有带手机时,可以临时使用。但每个密码只能使用一次,第二次使用就无效了。
最终信息被保存到 ~/.google_authenticator 文件下:
[root@localhost ~]# cat ~/.google_authenticator
XQLESYZGNN6BUILX
" RATE_LIMIT 3 30
" WINDOW_SIZE 17
" DISALLOW_REUSE
" TOTP_AUTH
38922819
16678863
40290258
78037940
91109687
为SSH服务器用google身份验证器
首先,修改PAM配置文件,命令和需要添加的内容如下:
[root@localhost ~]# vim /etc/pam.d/sshd
添加:auth required pam_google_authenticator.so
[root@localhost ~]# vim /etc/ssh/sshd_config
修改: ChallengeResponseAuthentication yes
[root@localhost ~]# service sshd restart
Stopping sshd:                                             [  OK  ]
Starting sshd:                                             [  OK  ]
再次连接ssh进行登录时,显示如下信息:要求输入验证码

注意: 当不出现Verification code 时,并且/var/log/secure 提示:
sshd(pam_google_authenticator)[1537]: Failed to read "/root/.google_authenticator"
需要关闭selinux, 执行如下命令:
setenforce 0
手机端配置
在苹果手机,应用商店,搜索google authenticator ,如下图,点击下载:

下载后,打开软件:

点击开始设置

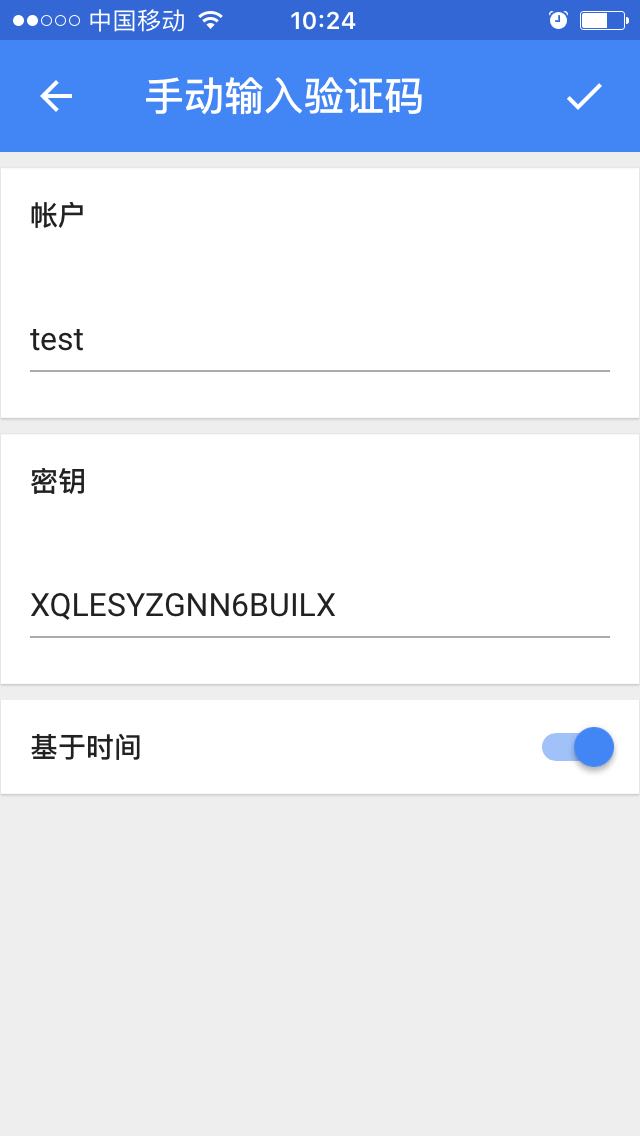
有两种选择,一个是扫描二维码输入验证码,一种是手动输入验证码,这里选择手动输入验证码(即最开始生成的XQLESYZGNN6BUILX密钥串

点击右上角的 对勾后,即可保存,实时显示生成的随机数字 如下图所示:

至此,手机端配置已经完成,每次需要输入随机数字时,打开app,看到的就是最新有效的随机数字
测试验证
[root@localhost Desktop]# ssh [email protected]
Verification code:
Password:
Last login: Sat Jun 17 17:43:14 2017 from 192.168.109.1
第一步输入手机端产生的随机数字,第二步输入root的本机密码,完成登录。
需求2: 如果只有外网访问时,才需要双因素认证,这样方便使用
在/etc/pam.d/sshd添加一行
auth [success=1 default=ignore] pam_access.so accessfile=/etc/security/access-localhost.conf
同时,在/etc/security/access-localhost.conf 中添加免双因素的ip地址
[root@localhost Desktop]# cat /etc/security/access-localhost.conf
#skipped local network for google auth...
+ : ALL : 192.168.109.0/24
+ : ALL : 127.0.0.1
- : ALL : ALL
这样配置后,192.168.109.0/24段和本地ip,不需要双因素认证。
需求3: 多台机器需要双因素认证,每个帐号都需要一个key,都保存在本地很难进行管理,因此,将用户key保存在远程集中管理很有必要,但是使用google authenticator 很难管理。
Google authenticator默认是无法实现的,但是其是开源,理论上可以实现需求,但修改其c代码相对复杂,这里 使用pam_python实现SSH的双因子认证登录。
- pam-python安装
wget https://sourceforge.net/projects/pam-python/files/pam-python-1.0.6-1/pam-python_1.0.6.orig.tar.gz --no-check-certificate
yum install pam pam-devel python-devel
tar zxvf pam-python_1.0.6.orig.tar.gz
cd pam-python_1.0.6.orig
cd src
python setup.py install
cp build/lib.linux-x86_64-2.6/pam_python.so /lib64/security/
创建文件 /lib/security/def_brute_ssh.py
#!/usr/bin/env python
# -*- coding=utf-8 -*-
import pwd
import urllib2


def get_pin(user):
    try:
        name = pwd.getpwnam(user).pw_name
        url = "http://127.0.0.1/pin.php?username="+name
        req = urllib2.Request(url)
        res_data = urllib2.urlopen(req)
        res = res_data.read()
        return res
    except Exception,e:
        print auth_log('error: ' + str(e))
        return ''
def pam_sm_authenticate(pamh, flags, argv):
    try:
            user = pamh.get_user()
            msg = pamh.Message(pamh.PAM_PROMPT_ECHO_OFF, "Enter Your PIN:")
            resp = pamh.conversation(msg)
            pin = get_pin(user)
            if pin == '':
                return pamh.PAM_AUTH_ERR
            if resp.resp == pin:
                return pamh.PAM_SUCCESS
    except  pamh.exception, e:
        return e.pam_result
    return pamh.PAM_AUTH_ERR
def pam_sm_setcred(pamh, flags, argv):
    return pamh.PAM_SUCCESS
def pam_sm_acct_mgmt(pamh, flags, argv):
    return pamh.PAM_SUCCESS
def pam_sm_open_session(pamh, flags, argv):
    return pamh.PAM_SUCCESS
def pam_sm_close_session(pamh, flags, argv):
    return pamh.PAM_SUCCESS
def pam_sm_chauthtok(pamh, flags, argv):
    return pamh.PAM_SUCCESS
Pin.php文件,直接简单将用户名输出,可以根据需要进行修改
<?php
   echo $_GET['username'];
?>
修改配置:
/etc/pam.d/sshd 最上面一行添加:
auth requisite pam_python.so def_brute_ssh.py
修改/etc/ssh/sshd_config,打开ChallengeResponse
ChallengeResponseAuthenticationyes
重启ssh服务
测试
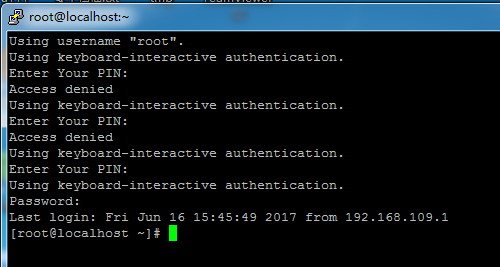
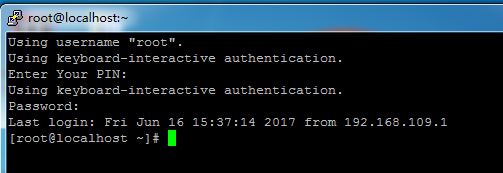
登录时,首先提示输入PIN码,PIN码验证失败,不允许进入密码验证环节

当pin码验证成功,在输入密码,都正确运行登录。

如果希望将整个密码认证过程,都在def_brute_ssh.py进行,则在配置文件/etc/pam.d/sshd 注释掉如下两行即可:
#auth      required pam_sepermit.so
#auth       include      password-auth
本例只是简单的演示重写认证,基于pam-python可以实现很多功能,有其他需求,自己开发
注意:当我们登录系统后,发现使用sudo 或者su等命令切换用户时,不需要使用二次认证。
主要因为sudo 或者su进行用户切换时,进行用户认证时,使用的是/etc/pam.d/su 和/etc/pam.d/sudo 而ssh登录时,修改的是/etc/pam.d/sshd,因此是不一样的。更多信息,参考man pam。
FAQ:
Google Authenticator 测试
Google authenticator双因素配置是针对帐号的,比如系统有两个帐号root和test,使用google authenticator 时,只配置了root帐号,那么test帐号主目录下无.google_authenticator,没有办法认证成功。
参考文献:
双因素的配置
https://linux.cn/article-3725-1.html
关闭selinux
http://www.ithao123.cn/content-4874029.html
系统时间一致性问题
http://www.cnblogs.com/iamlehaha/articles/6851788.html
内网不需要双因素认证
http://www.cnblogs.com/hanyifeng/p/5516053.html
pam_python 使用
http://www.tuicool.com/articles/VFJJVjr
https://www.secpulse.com/archives/4606.html
https://github.com/ipcpu/pam-python-ipcpu/blob/master/utils/2factor-with-SMS/auth.py
PAM介绍
http://blog.csdn.net/chenyulancn/article/details/8013691
http://www.cnblogs.com/ilinuxer/p/5087447.html
PAM模块源代码分析
http://blog.csdn.net/chenyulancn/article/details/8023431
PHP实现OATH动态口令算法
http://blog.csdn.net/anda0109/article/details/50786868
pyotp 实现python双因素代码
http://www.cnblogs.com/iamlehaha/p/6596131.html
google authenticator 源代码
https://github.com/google/google-authenticator
mobile客户端